Herramienta Gratuita · Arquitectos y Diseñadores
Prompts Gratis para Renders de Arquitectura con ChatGPT
Plantillas de prompts listas para copiar y pegar en ChatGPT con GPT Image 2. Escritas por el equipo de Render AI en formato de instrucción, para sketch a render, interiores, exteriores, paneles de concurso y texto dentro de la imagen.
Biblioteca de Prompts para ChatGPT
Elige una categoría. Cada subcategoría incluye tres variantes listas para copiar. Ábrelas directamente en ChatGPT o envíalas a Render AI Create.
Convierte sketches a mano, plantas, exportaciones CAD y capturas de viewport 3D en imágenes fotorrealistas conservando tu geometría.
Consejos para Sketch y CAD a Render
- → Sube primero el dibujo y después envía el prompt — ChatGPT lee la imagen antes de planificar el render
- → Empieza con un bloqueo explícito: mantén la volumetría, los huecos y la cubierta exactamente como están dibujados
- → Indica qué debe inventar el modelo (materiales, cielo, vegetación) y qué no debe tocar
- → Pide un cambio por turno — la edición conversacional funciona mejor que reescribir todo el brief
Estructura del Prompt
Convierte el [tipo de dibujo] subido en un render arquitectónico fotorrealista. Mantén [geometría a preservar] exactamente como está dibujada. Materiales: [superficies]. Iluminación: [hora y dirección]. Cámara: [punto de vista y objetivo]. Contexto: [entorno y personas]. Salida: [proporción], 4K, fotografía arquitectónica profesional. Sketch a Mano a Render Exterior
Variante 1
Turn the uploaded hand sketch into a photorealistic architectural render. Keep the massing, window positions, roof pitch and proportions exactly as drawn — do not add or remove volumes. Materials: board-formed concrete base, weathered oak vertical cladding, bronze-anodised window frames. Lighting: late afternoon side light, long soft shadows, thin high cloud. Camera: eye-level, 35 mm, slight three-quarter view. Add two people near the entrance for scale. Output: 16:9, professional architectural photography.
Variante 2
Convert this pen sketch into a realistic exterior visualisation. Preserve the drawn silhouette and opening rhythm precisely; interpret only surface finish and surroundings. Materials: white through-coloured render, dark grey standing-seam zinc roof, timber soffits. Lighting: overcast diffused daylight, no harsh shadows, damp ground. Context: mature garden, gravel path, low stone boundary wall. Camera: 28 mm wide-angle from the garden. Output: 3:2, photorealistic render.
Variante 3
Render the uploaded marker sketch as a finished building photograph. Match the drawn geometry line for line, including the cantilever depth and the position of the staircase. Materials: dark charcoal fibre-cement panels, warm larch screens, frameless glazing. Lighting: golden hour, low sun raking across the facade. Context: sloping site, native grasses, distant hills. Camera: low angle, 24 mm. Output: 16:9, 4K, architectural photography.
Planta a Interior Amueblado
Variante 1
Read the uploaded floor plan and generate a photorealistic interior view looking from the entrance towards the terrace, following the exact room layout, wall positions and door openings shown. Furnish it as a contemporary family home: light oak flooring, plaster walls, low linen sofa, open kitchen with stone island. Lighting: soft mid-morning daylight from the terrace glazing. Camera: eye-level, 24 mm one-point perspective. Output: 16:9, interior design photography.
Variante 2
Use the uploaded apartment plan as the spatial ground truth and produce a realistic interior render of the living-dining area. Respect the drawn dimensions and the position of the structural columns. Style: warm minimalism with micro-cement floors, walnut joinery, boucle armchairs and a single sculptural pendant. Lighting: late afternoon sun entering from the west window. Camera: 35 mm from the hallway corner. Output: 3:2, photorealistic interior visualisation.
Variante 3
From the uploaded plan, generate an aerial cutaway render of the whole apartment with the roof removed, keeping every wall, door and window exactly where it is drawn. Furnish all rooms consistently in a Scandinavian palette: light oak, off-white walls, muted green textiles. Lighting: even soft daylight, subtle contact shadows. Camera: isometric-style top-down three-quarter view. Output: 4:3, architectural visualisation.
Captura de Viewport 3D a Render
Variante 1
Turn this untextured SketchUp screenshot into a finished architectural render. Keep the camera, geometry and proportions identical — this is a material and lighting pass only. Materials: exposed concrete structure, oak infill panels, clear low-iron glazing, dark metal handrails. Lighting: clear morning sun from the left, crisp shadows, blue sky with light haze. Add realistic vegetation and two walking figures. Output: 16:9, 4K, photorealistic architectural photography.
Variante 2
Post-produce the uploaded Revit viewport image into a client-ready visualisation. Do not change the model geometry or the camera angle. Add physically accurate materials: honed limestone plinth, powder-coated aluminium mullions, brushed steel canopy. Lighting: overcast studio-like daylight for a neutral material read. Context: wet paving with soft reflections, a few background figures out of focus. Output: 16:9, architectural photography.
Variante 3
Take this clay-render 3D screenshot and produce a photorealistic version with the same framing. Preserve all edges and the exact roof geometry. Materials: charcoal brick, Corten steel fins, warm timber entrance reveal. Lighting: dusk, interior lights just switched on, deep blue sky. Context: quiet residential street, parked bicycle, street tree. Output: 3:2, 4K, photorealistic render.
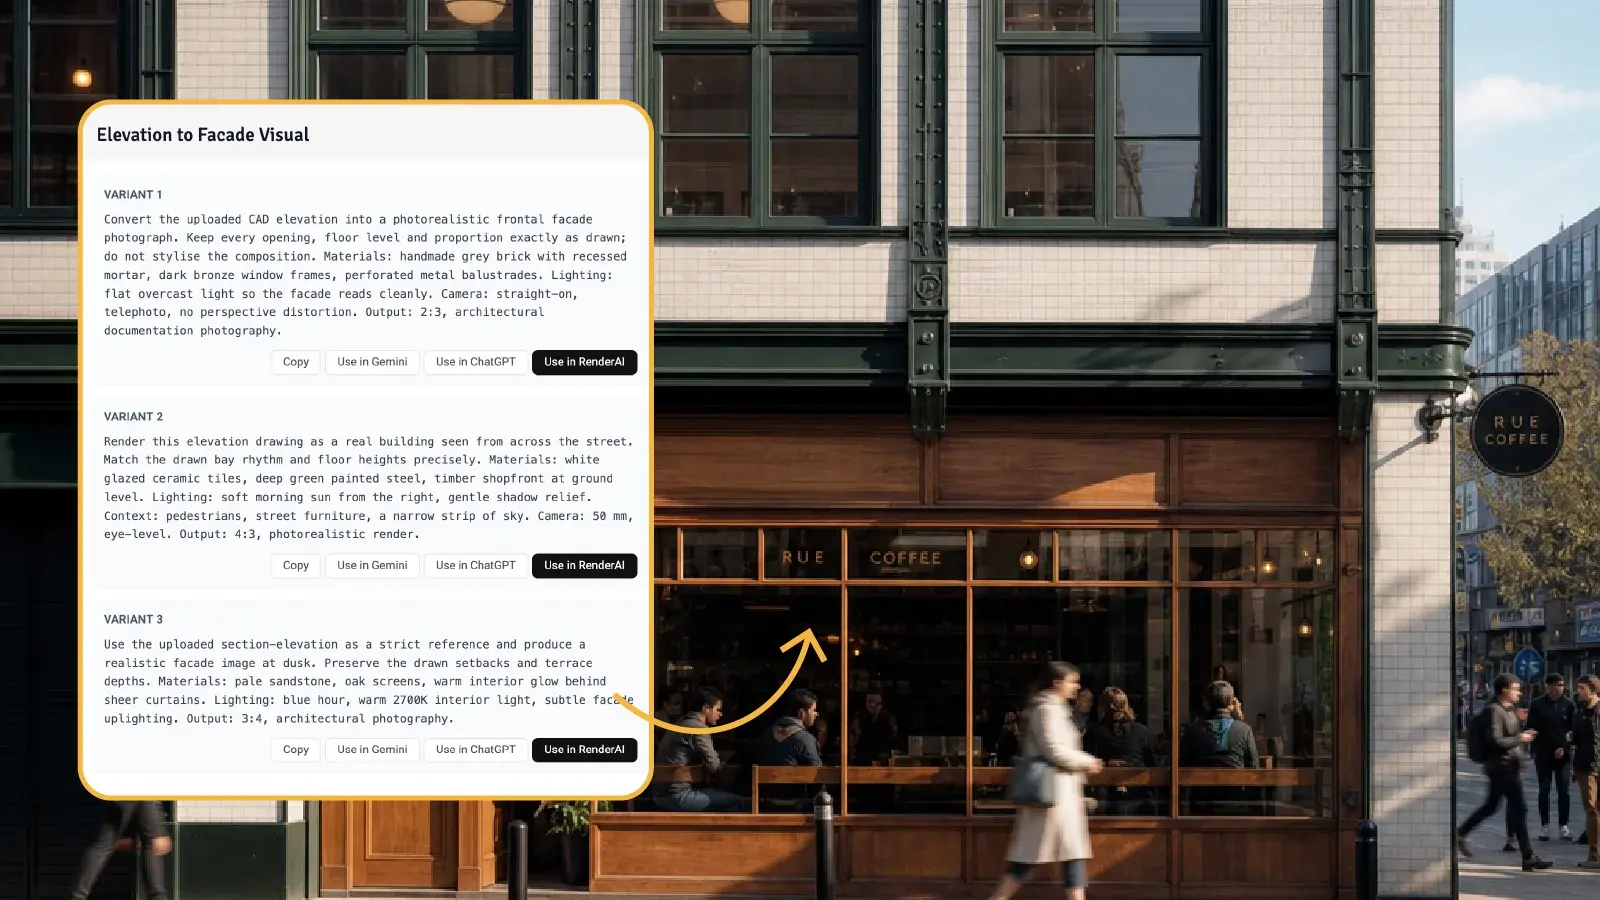
Alzado a Imagen de Fachada
Variante 1
Convert the uploaded CAD elevation into a photorealistic frontal facade photograph. Keep every opening, floor level and proportion exactly as drawn; do not stylise the composition. Materials: handmade grey brick with recessed mortar, dark bronze window frames, perforated metal balustrades. Lighting: flat overcast light so the facade reads cleanly. Camera: straight-on, telephoto, no perspective distortion. Output: 2:3, architectural documentation photography.
Variante 2
Render this elevation drawing as a real building seen from across the street. Match the drawn bay rhythm and floor heights precisely. Materials: white glazed ceramic tiles, deep green painted steel, timber shopfront at ground level. Lighting: soft morning sun from the right, gentle shadow relief. Context: pedestrians, street furniture, a narrow strip of sky. Camera: 50 mm, eye-level. Output: 4:3, photorealistic render.
Variante 3
Use the uploaded section-elevation as a strict reference and produce a realistic facade image at dusk. Preserve the drawn setbacks and terrace depths. Materials: pale sandstone, oak screens, warm interior glow behind sheer curtains. Lighting: blue hour, warm 2700K interior light, subtle facade uplighting. Output: 3:4, architectural photography.
Foto de Solar + Volumetría
Variante 1
I am uploading two images: a photograph of the existing site and a sketch of the proposed massing. Insert the proposed building into the site photo with correct perspective, scale and shadow direction. Keep the existing context, trees, road and sky from the photograph untouched. Materials for the new volume: light concrete, timber louvres, large glazed openings. Match the photograph's lighting exactly. Output: 16:9, photorealistic architectural montage.
Variante 2
Using the uploaded site photograph as the base plate and the second image as the proposed volume, produce a realistic before/after style visualisation of the new building on the plot. Preserve the camera position, horizon line and the neighbouring buildings. Add ground-level landscaping and two pedestrians for scale. Lighting: match the existing photo's overcast light. Output: 3:2, architectural photomontage.
Variante 3
Composite the proposed extension shown in the second image onto the existing house in the first photograph. Keep the original house, roof and garden exactly as photographed and attach the extension where indicated. Materials: dark stained timber cladding, aluminium sliding doors, flat sedum roof. Lighting: consistent with the source photo, including shadow direction and colour temperature. Output: 16:9, photorealistic render.
Sketch a Mano a Render Interior
Variante 1
Turn the uploaded interior sketch into a photorealistic render. Keep the room proportions, ceiling height, window position and furniture layout exactly as drawn. Materials: micro-cement floor, lime plaster walls, oak joinery, linen upholstery. Lighting: soft daylight entering from the drawn window on the left, warm 2700K accent lamps switched on. Camera: match the perspective of the sketch, eye-level, 28 mm. Output: 16:9, interior design photography.
Variante 2
Convert this rough perspective sketch of a double-height space into a realistic interior visualisation. Preserve the drawn staircase position, mezzanine edge and structural rhythm exactly. Materials: exposed concrete, blackened steel balustrade, warm oak treads, sheer curtains. Lighting: high side light from clerestory glazing, long soft shadows down the wall. Add one person on the stair for scale. Output: 3:4, photorealistic interior render.
Variante 3
Render the uploaded interior line drawing as a finished photograph, keeping every drawn element in place — joinery runs, door swings, ceiling coffers and the sofa position. Style: warm contemporary with travertine, walnut and bouclé. Lighting: overcast diffused daylight for a neutral material read, no direct sun. Camera: identical framing to the drawing, 35 mm. Output: 16:9, interior design photography.
Instrucciones, No Palabras Clave
Por Qué los Prompts de ChatGPT Se Escriben Distinto
La mayoría de bibliotecas de prompts están escritas para modelos que buscan coincidencias de palabras clave. ChatGPT funciona de otra forma: GPT Image 2 razona sobre el brief antes de dibujar, así que premia la manera en que un arquitecto redacta realmente una instrucción.
Eso cambia el formato. En lugar de "casa moderna, hormigón, hora dorada, 16:9", das una directiva, bloqueas lo que no debe cambiar y después añades cláusulas etiquetadas de materiales, iluminación, cámara y salida.
Todas las plantillas de esta página siguen esa estructura. No cuesta nada en longitud y aporta un salto grande de control — sobre todo cuando trabajas a partir de un sketch, una planta o una captura de viewport 3D.
Empieza por la Acción
Abre con lo que quieres que haga — convierte el sketch subido en un render fotorrealista — antes de describir nada. El modelo planifica toda la imagen alrededor de esa primera frase.
Bloquea lo que No Debe Cambiar
Indica explícitamente qué partes del dibujo subido son fijas: volumetría, posición de huecos, pendiente de cubierta, cámara. Sin ese bloqueo, GPT Image 2 mejorará tu geometría por su cuenta.
Un Cambio por Turno
ChatGPT mantiene la conversación. Pide una sola modificación en cada turno — cambia el revestimiento a Corten, pasa a atardecer — y conservará todo lo demás en lugar de regenerar desde cero.
El Modelo Detrás de ChatGPT Images
Cómo Trabaja GPT Image 2 en Arquitectura
GPT Image 2 — disponible dentro de ChatGPT como ChatGPT Images 2.0 — es el modelo de imagen con razonamiento de OpenAI. Para trabajo de diseño importan tres capacidades:
- Texto legible en la imagen: títulos de panel, etiquetas, escalas, señalética
- Hasta 16 imágenes de referencia: sketch más foto del solar más materiales
- Edición conversacional: cambia una cosa y conserva el resto de la imagen
La contrapartida es el rendimiento. ChatGPT trabaja de una petición en una, los límites de imágenes varían según el plan y la geometría puede desviarse en cadenas largas de iteración. Para un proyecto real que necesita volumen y fidelidad estructural, combínalo con Render AI.
GPT Image 2 - Especificaciones
- Modelo
- GPT Image 2 (ChatGPT Images 2.0)
- Resolución de Salida
- 1K, 2K y 4K (lado largo hasta 3840 px)
- Proporciones
- 1:1, 3:2, 2:3, 4:3, 3:4, 16:9, 9:16, 21:9, 2:1, 1:2
- Imágenes de Referencia
- Hasta 16 por solicitud
- Modos
- Instantáneo · Thinking (planes de pago)
- Texto en la Imagen
- Casi perfecto en inglés, sólido en otros idiomas
- Tiempo de Generación
- ~10s instantáneo · 15-60s thinking
Ingeniería de Prompts
Técnicas Avanzadas de Prompting en ChatGPT
Aplícalas sobre las plantillas anteriores para obtener resultados más precisos y reproducibles
Bloquear y Cambiar
El patrón más útil en ChatGPT. Nombra todo lo que se mantiene fijo y después lo único que cambia. Repítelo en cada turno y la imagen se mantiene coherente durante todo un estudio.
Ejemplo
Keep the geometry, camera, materials and people exactly as in the previous image. Change only the lighting to blue hour with the interior lights switched on at 2700K. Output: 16:9.
Da un Rol a Cada Referencia
Cuando subes varias imágenes, dile al modelo para qué sirve cada una. Sin roles las promedia; con roles las usa como instrucciones separadas.
Ejemplo
Use image 1 for the geometry and camera, image 2 for the material palette only, and image 3 for the sky and lighting condition. Do not copy any object from image 2 or 3 into the scene.
Entrecomilla el Texto que Quieres
GPT Image 2 reproduce las palabras que pones entre comillas. Úsalo para títulos de panel, marcas de nivel, pies de foto y señalética — y mantén la paleta tipográfica deliberadamente estrecha.
Ejemplo
Add a title block in the top-left with the exact text "RIVERSIDE CIVIC CENTRE" in bold and "Stage 2 Submission" beneath it in light weight. One sans-serif, two weights, no decorative lettering.
Pide un Set Comparativo
En lugar de generar opciones de una en una, pide un conjunto con una constante compartida. Mantiene cámara y geometría idénticas para que la comparación sea justa.
Ejemplo
Produce four frames of the same facade bay with identical camera and neutral overcast lighting in every frame: brick, timber cladding, fibre-cement, Corten steel. Label each frame with the material name.
Formato de Salida
Proporciones Soportadas por GPT Image 2
Indica la proporción al final del prompt. Consulta siempre las bases del concurso — algunas exigen explícitamente A1 vertical (aprox. 3:4) o A0 horizontal. Si dudas, 16:9 es la opción más segura.
Renders heroicos, diapositivas de vídeo, presentaciones en pantalla grande
Planchas de concurso horizontales, composiciones estilo A0
Informes imprimibles, vistas en formato A1
Estudios de detalle, primeros planos de patrones, imágenes para Instagram
Panoramas cinematográficos, planchas de exposición en formato ancho
Perspectivas a nivel de calle, contenido vertical para redes sociales
Planchas de concurso en vertical, formato A1 vertical
Estudios de fachada alta, perspectivas urbanas en vertical
Flujo de Trabajo
Cómo Usar Estos Prompts en ChatGPT
- 1
Sube primero tu dibujo
Adjunta el sketch, la planta, el alzado o la captura del viewport 3D antes de enviar el prompt. ChatGPT lee la imagen mientras planifica el render. Puedes adjuntar hasta 16 referencias en una misma petición.
- 2
Copia la plantilla más cercana
Elige la categoría que corresponde a tu tarea y copia la variante más próxima a tu intención. Usa el botón Abrir en ChatGPT para enviarla directamente a un chat nuevo.
- 3
Edita la cláusula de bloqueo
Reescribe la frase que dice qué no debe cambiar para que nombre tu propia geometría — volumetría, posición de huecos, línea de cubierta, cámara. Es la edición con más impacto de todas.
- 4
Añade los datos de tu proyecto
Sustituye por tus materiales reales, el carácter del lugar y la condición lumínica: mediterráneo costero, hormigón encofrado a tabla, sol bajo desde el oeste. Mantén intacta la estructura de cláusulas.
- 5
Activa Thinking para briefs complejos
Para paneles, diagramas, láminas multi-vista y cualquier cosa con texto dentro de la imagen, usa el modo Thinking en un plan de pago. Planifica y revisa la composición antes de generar.
- 6
Itera con un cambio por turno
Trata la primera imagen como un borrador. Pide una sola modificación en cada turno y repite el bloqueo. Cuando la geometría empiece a desviarse, vuelve a subir el dibujo original y empieza una cadena nueva.
Dónde Gana Cada Herramienta
ChatGPT y Render AI en el Mismo Flujo
No compiten en tu escritorio. ChatGPT es excelente para explorar, para paneles y para todo lo que lleva rotulación. Render AI está hecho para la parte de producción: fidelidad estructural, lotes, organización de proyectos y vídeo.
| Criterio | ChatGPT (GPT Image 2) | Render AI |
|---|---|---|
| Prompting | Conversacional, excelente siguiendo briefs escritos largos | Controles y presets específicos de diseño |
| Fidelidad al sketch | Buena, aunque la geometría puede desviarse entre iteraciones | Modos con estructura bloqueada, pensados para sketch y CAD |
| Texto dentro de la imagen | El mejor de su clase — paneles, etiquetas, señalética | No es el foco; pero aceptable |
| Volumen de imágenes | Limitado por plan, una solicitud cada vez | Varias sesiones y variaciones en paralelo |
| Organización del proyecto | Vive dentro de un hilo de chat | Proyectos, tableros, versiones y compartición con clientes |
| Ampliación | Sin escalador real — te quedas con el tamaño con el que generó | Escalador con IA dedicado a +4K y +6K de resolución de impresión, añadiendo detalle |
| Vídeo | Herramienta aparte, fuera del flujo de imagen | Anima cualquier render y conviértelo en un recorrido o orbitado |
Para Seguir Leyendo
Recursos para Arquitectos y Diseñadores
Documentación oficial de OpenAI, cobertura en medios de arquitectura y más bibliotecas de prompts del equipo de Render AI.
Fuentes Oficiales
Medios de Arquitectura
Más de Render AI
Preguntas Frecuentes
Sobre la generación de imágenes de ChatGPT y GPT Image 2 para render arquitectónico
- ChatGPT genera imágenes con GPT Image 2, disponible dentro de ChatGPT como ChatGPT Images 2.0. Razona sobre la petición antes de dibujar, lo que lo hace muy bueno siguiendo briefs escritos largos — justo como los arquitectos describen un proyecto. Gestiona bien los cambios de material, de hora del día y las composiciones de presentación. Su ventaja más clara frente a otros modelos es el texto legible dentro de la imagen, lo que lo hace realmente útil para paneles de concurso, diagramas y maquetas de señalética.
- Escribe una instrucción, no una lista de palabras clave. Empieza por la acción (convierte el sketch subido en un render fotorrealista), después bloquea lo que no debe cambiar (mantén la volumetría y la posición de los huecos exactamente como están dibujados), y a continuación especifica materiales, dirección y temperatura de color de la luz, posición de cámara y objetivo, contexto y personas, y por último el formato de salida y la proporción. GPT Image 2 sigue las cláusulas etiquetadas mucho mejor que las etiquetas separadas por comas.
- Sí. Sube primero el sketch, la planta, el alzado o la captura del viewport 3D y envía el prompt en el mismo mensaje o en el siguiente. ChatGPT lee la imagen antes de planificar el render. Puedes adjuntar hasta 16 imágenes de referencia en una sola petición, lo que permite combinar un sketch con una foto del solar y muestras de materiales. La fidelidad geométrica es buena, pero puede desviarse tras varias iteraciones: vuelve a subir el dibujo original cuando empieces una dirección nueva.
- Porque escribe texto con precisión. Puedes pedir un título concreto, etiquetas de dibujo, marcas de nivel, una escala gráfica y pies de foto con las palabras exactas entre comillas, y las reproduce. Otros modelos de imagen suelen producir letras que parecen texto pero no se pueden leer. Verifica siempre tú las cotas y anotaciones técnicas — el modelo escribe cifras convincentes que no ha calculado.
- OpenAI no publica una tabla fija y ajusta los límites según la demanda. En la práctica, las cuentas gratuitas obtienen unas pocas generaciones al día y solo en modo Instantáneo, mientras que los planes Plus, Pro, Business y Enterprise tienen límites mucho más altos y acceso al modo Thinking, que planifica y revisa la imagen antes de generarla. Si necesitas volumen constante, lotes y variaciones para un proyecto real, una plataforma de render dedicada elimina el problema del límite.
- Sí. La estructura es transferible. El formato de instrucción usado aquí funciona con Render AI, Nano Banana Pro, Midjourney y herramientas basadas en Flux — como mucho tendrás que acortar el brief en los modelos que no razonan antes de generar. Cada prompt de esta página tiene un botón para abrirlo directamente en ChatGPT, en Gemini o dentro de Render AI Create.
Render AI
Sin Límites Diarios. Sin Perder la Geometría.
Sube tu sketch, pega cualquier prompt de esta página y consigue un render arquitectónico profesional en segundos con Render AI.
Crear Render con IA Gratis