Free Tool · Architects & Designers
Free Architecture AI Rendering Prompts for ChatGPT
Copy-paste prompt templates for ChatGPT image generation with GPT Image 2. Written as instruction-first briefs by the Render AI team, for sketch-to-render, interiors, exteriors, competition boards, and text inside the image.
ChatGPT Prompt Library
Pick a category. Every subcategory has three copy-paste variants. Open one directly in ChatGPT, or send it straight to Render AI Create.
Turn hand sketches, floor plans, CAD exports and 3D viewport screenshots into photorealistic images while keeping your geometry intact.
Tips for Sketch & CAD to Render
- → Upload the drawing first, then send the prompt — ChatGPT reads the image before it plans the render
- → Open with an explicit lock: keep the massing, openings and roof line exactly as drawn
- → Name what the model must invent (materials, sky, vegetation) and what it must not touch
- → Ask for one change per turn — conversational editing beats rewriting the whole brief
Prompt Structure
Turn the uploaded [drawing type] into a photorealistic architectural render. Keep [geometry to preserve] exactly as drawn. Materials: [surfaces]. Lighting: [time of day and direction]. Camera: [viewpoint and lens]. Context: [site and people]. Output: [aspect ratio], 4K, professional architectural photography. Hand Sketch to Exterior Render
Variant 1
Turn the uploaded hand sketch into a photorealistic architectural render. Keep the massing, window positions, roof pitch and proportions exactly as drawn — do not add or remove volumes. Materials: board-formed concrete base, weathered oak vertical cladding, bronze-anodised window frames. Lighting: late afternoon side light, long soft shadows, thin high cloud. Camera: eye-level, 35 mm, slight three-quarter view. Add two people near the entrance for scale. Output: 16:9, professional architectural photography.
Variant 2
Convert this pen sketch into a realistic exterior visualisation. Preserve the drawn silhouette and opening rhythm precisely; interpret only surface finish and surroundings. Materials: white through-coloured render, dark grey standing-seam zinc roof, timber soffits. Lighting: overcast diffused daylight, no harsh shadows, damp ground. Context: mature garden, gravel path, low stone boundary wall. Camera: 28 mm wide-angle from the garden. Output: 3:2, photorealistic render.
Variant 3
Render the uploaded marker sketch as a finished building photograph. Match the drawn geometry line for line, including the cantilever depth and the position of the staircase. Materials: dark charcoal fibre-cement panels, warm larch screens, frameless glazing. Lighting: golden hour, low sun raking across the facade. Context: sloping site, native grasses, distant hills. Camera: low angle, 24 mm. Output: 16:9, 4K, architectural photography.
Floor Plan to Furnished Interior
Variant 1
Read the uploaded floor plan and generate a photorealistic interior view looking from the entrance towards the terrace, following the exact room layout, wall positions and door openings shown. Furnish it as a contemporary family home: light oak flooring, plaster walls, low linen sofa, open kitchen with stone island. Lighting: soft mid-morning daylight from the terrace glazing. Camera: eye-level, 24 mm one-point perspective. Output: 16:9, interior design photography.
Variant 2
Use the uploaded apartment plan as the spatial ground truth and produce a realistic interior render of the living-dining area. Respect the drawn dimensions and the position of the structural columns. Style: warm minimalism with micro-cement floors, walnut joinery, boucle armchairs and a single sculptural pendant. Lighting: late afternoon sun entering from the west window. Camera: 35 mm from the hallway corner. Output: 3:2, photorealistic interior visualisation.
Variant 3
From the uploaded plan, generate an aerial cutaway render of the whole apartment with the roof removed, keeping every wall, door and window exactly where it is drawn. Furnish all rooms consistently in a Scandinavian palette: light oak, off-white walls, muted green textiles. Lighting: even soft daylight, subtle contact shadows. Camera: isometric-style top-down three-quarter view. Output: 4:3, architectural visualisation.
3D Viewport Screenshot to Render
Variant 1
Turn this untextured SketchUp screenshot into a finished architectural render. Keep the camera, geometry and proportions identical — this is a material and lighting pass only. Materials: exposed concrete structure, oak infill panels, clear low-iron glazing, dark metal handrails. Lighting: clear morning sun from the left, crisp shadows, blue sky with light haze. Add realistic vegetation and two walking figures. Output: 16:9, 4K, photorealistic architectural photography.
Variant 2
Post-produce the uploaded Revit viewport image into a client-ready visualisation. Do not change the model geometry or the camera angle. Add physically accurate materials: honed limestone plinth, powder-coated aluminium mullions, brushed steel canopy. Lighting: overcast studio-like daylight for a neutral material read. Context: wet paving with soft reflections, a few background figures out of focus. Output: 16:9, architectural photography.
Variant 3
Take this clay-render 3D screenshot and produce a photorealistic version with the same framing. Preserve all edges and the exact roof geometry. Materials: charcoal brick, Corten steel fins, warm timber entrance reveal. Lighting: dusk, interior lights just switched on, deep blue sky. Context: quiet residential street, parked bicycle, street tree. Output: 3:2, 4K, photorealistic render.
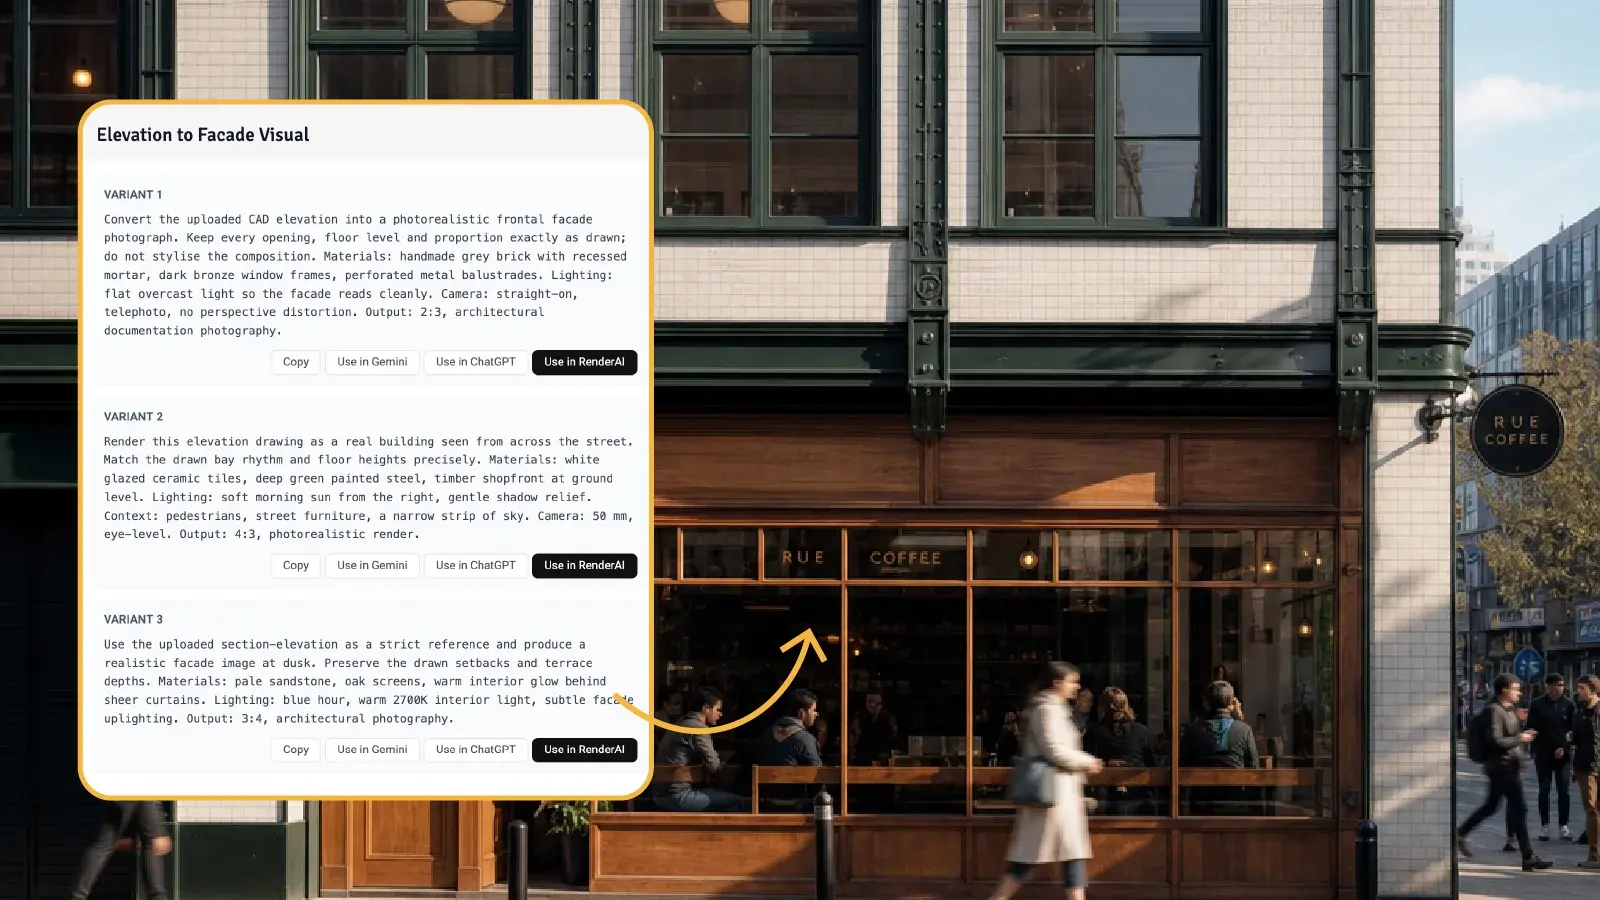
Elevation to Facade Visual
Variant 1
Convert the uploaded CAD elevation into a photorealistic frontal facade photograph. Keep every opening, floor level and proportion exactly as drawn; do not stylise the composition. Materials: handmade grey brick with recessed mortar, dark bronze window frames, perforated metal balustrades. Lighting: flat overcast light so the facade reads cleanly. Camera: straight-on, telephoto, no perspective distortion. Output: 2:3, architectural documentation photography.
Variant 2
Render this elevation drawing as a real building seen from across the street. Match the drawn bay rhythm and floor heights precisely. Materials: white glazed ceramic tiles, deep green painted steel, timber shopfront at ground level. Lighting: soft morning sun from the right, gentle shadow relief. Context: pedestrians, street furniture, a narrow strip of sky. Camera: 50 mm, eye-level. Output: 4:3, photorealistic render.
Variant 3
Use the uploaded section-elevation as a strict reference and produce a realistic facade image at dusk. Preserve the drawn setbacks and terrace depths. Materials: pale sandstone, oak screens, warm interior glow behind sheer curtains. Lighting: blue hour, warm 2700K interior light, subtle facade uplighting. Output: 3:4, architectural photography.
Site Photo + Massing Overlay
Variant 1
I am uploading two images: a photograph of the existing site and a sketch of the proposed massing. Insert the proposed building into the site photo with correct perspective, scale and shadow direction. Keep the existing context, trees, road and sky from the photograph untouched. Materials for the new volume: light concrete, timber louvres, large glazed openings. Match the photograph's lighting exactly. Output: 16:9, photorealistic architectural montage.
Variant 2
Using the uploaded site photograph as the base plate and the second image as the proposed volume, produce a realistic before/after style visualisation of the new building on the plot. Preserve the camera position, horizon line and the neighbouring buildings. Add ground-level landscaping and two pedestrians for scale. Lighting: match the existing photo's overcast light. Output: 3:2, architectural photomontage.
Variant 3
Composite the proposed extension shown in the second image onto the existing house in the first photograph. Keep the original house, roof and garden exactly as photographed and attach the extension where indicated. Materials: dark stained timber cladding, aluminium sliding doors, flat sedum roof. Lighting: consistent with the source photo, including shadow direction and colour temperature. Output: 16:9, photorealistic render.
Hand Sketch to Interior Render
Variant 1
Turn the uploaded interior sketch into a photorealistic render. Keep the room proportions, ceiling height, window position and furniture layout exactly as drawn. Materials: micro-cement floor, lime plaster walls, oak joinery, linen upholstery. Lighting: soft daylight entering from the drawn window on the left, warm 2700K accent lamps switched on. Camera: match the perspective of the sketch, eye-level, 28 mm. Output: 16:9, interior design photography.
Variant 2
Convert this rough perspective sketch of a double-height space into a realistic interior visualisation. Preserve the drawn staircase position, mezzanine edge and structural rhythm exactly. Materials: exposed concrete, blackened steel balustrade, warm oak treads, sheer curtains. Lighting: high side light from clerestory glazing, long soft shadows down the wall. Add one person on the stair for scale. Output: 3:4, photorealistic interior render.
Variant 3
Render the uploaded interior line drawing as a finished photograph, keeping every drawn element in place — joinery runs, door swings, ceiling coffers and the sofa position. Style: warm contemporary with travertine, walnut and bouclé. Lighting: overcast diffused daylight for a neutral material read, no direct sun. Camera: identical framing to the drawing, 35 mm. Output: 16:9, interior design photography.
Instructions, Not Keywords
Why ChatGPT Prompts Are Written Differently
Most prompt libraries are written for models that match keywords. ChatGPT is different: GPT Image 2 reasons about the brief before it draws, so it rewards the way an architect actually writes an instruction.
That changes the format. Instead of "modern house, concrete, golden hour, 16:9", you give a directive, a lock on what must not change, then labelled clauses for materials, lighting, camera and output.
Every template on this page follows that structure. It costs you nothing in length and buys a large gain in control — especially when you are working from an uploaded sketch, plan or 3D viewport screenshot.
Lead With the Action
Open with what you want done — turn the uploaded sketch into a photorealistic render — before you describe anything. The model plans the whole image around that first sentence.
Lock What Must Not Change
State explicitly which parts of the uploaded drawing are fixed: massing, opening positions, roof pitch, camera. Without a lock, GPT Image 2 will improve your geometry for you.
One Change per Turn
ChatGPT keeps the conversation. Ask for a single edit each turn — swap the cladding to Corten, move to dusk — and it preserves everything else instead of regenerating from scratch.
The Model Behind ChatGPT Images
How GPT Image 2 Handles Architectural Work
GPT Image 2 — shipped inside ChatGPT as ChatGPT Images 2.0 — is OpenAI's reasoning image model. For design work, three capabilities matter:
- Legible text in image: board titles, drawing labels, scale bars, signage
- Up to 16 reference images: sketch plus site photo plus material samples
- Conversational editing: change one thing and keep the rest of the image
The trade-off is throughput. ChatGPT works one request at a time, image caps vary by plan, and geometry can drift over long iteration chains. For a live project that needs volume and structure fidelity, pair it with Render AI.
GPT Image 2 - Key Specs
- Model
- GPT Image 2 (ChatGPT Images 2.0)
- Output Resolution
- 1K, 2K and 4K (long edge up to 3840 px)
- Aspect Ratios
- 1:1, 3:2, 2:3, 4:3, 3:4, 16:9, 9:16, 21:9, 2:1, 1:2
- Reference Images
- Up to 16 per request
- Modes
- Instant · Thinking (paid plans)
- Text in Image
- Near-perfect in English, strong multilingual
- Generation Time
- ~10s instant · 15-60s thinking
Prompt Engineering
Advanced ChatGPT Prompting Techniques
Layer these on top of the templates above for tighter, more reproducible results
Lock and Change
The most useful pattern in ChatGPT. Name everything that stays fixed, then name the single thing that changes. Repeat it every turn and the image stays consistent across a whole study.
Example
Keep the geometry, camera, materials and people exactly as in the previous image. Change only the lighting to blue hour with the interior lights switched on at 2700K. Output: 16:9.
Give Each Reference a Role
When you upload several images, tell the model what each one is for. Without roles it averages them; with roles it uses them as separate instructions.
Example
Use image 1 for the geometry and camera, image 2 for the material palette only, and image 3 for the sky and lighting condition. Do not copy any object from image 2 or 3 into the scene.
Quote the Text You Want
GPT Image 2 reproduces words placed inside quotation marks. Use it for board titles, level markers, captions and signage — and keep the type palette deliberately narrow.
Example
Add a title block in the top-left with the exact text "RIVERSIDE CIVIC CENTRE" in bold and "Stage 2 Submission" beneath it in light weight. One sans-serif, two weights, no decorative lettering.
Ask for a Comparison Set
Instead of generating options one at a time, ask for a set with a shared constant. It keeps camera and geometry identical so the comparison is actually fair.
Example
Produce four frames of the same facade bay with identical camera and neutral overcast lighting in every frame: brick, timber cladding, fibre-cement, Corten steel. Label each frame with the material name.
Output Format
Aspect Ratios Supported by GPT Image 2
State the ratio at the end of the prompt. Always check competition briefs — some explicitly require A1 portrait (about 3:4) or A0 landscape. If you are unsure, 16:9 is the safest default.
Hero renders, video slides, large-screen presentations
Landscape competition boards, A0-style compositions
Print-friendly reports, A1 layout-style views
Detail studies, pattern close-ups, Instagram imagery
Cinematic panoramas, wide-format exhibition boards
Street-level perspectives, social-first vertical content
Portrait competition boards, A1 portrait format
Tall facade studies, portrait urban perspectives
Workflow
How to Use These Prompts in ChatGPT
- 1
Upload your drawing first
Attach the sketch, floor plan, elevation or 3D viewport screenshot before you send the prompt. ChatGPT reads the image while it plans the render. You can attach up to 16 references in one request.
- 2
Copy the closest template
Pick the category that matches your task and copy the variant nearest to your intent. Use the Open in ChatGPT button to send it straight into a new chat.
- 3
Edit the locked clause
Rewrite the sentence that says what must not change so it names your own geometry — massing, opening positions, roof line, camera. This is the single highest-impact edit you can make.
- 4
Add your project specifics
Swap in your real materials, location character and light condition: Mediterranean coastal, board-formed concrete, low sun from the west. Keep the labelled clause structure intact.
- 5
Turn on Thinking for complex briefs
For boards, diagrams, multi-view sheets and anything with text in the image, use Thinking mode on a paid plan. It plans and checks the layout before generating.
- 6
Iterate with one change per turn
Treat the first image as a draft. Ask for a single change each turn and restate the lock. When geometry starts drifting, re-upload the original drawing and begin a fresh chain.
Where Each Tool Wins
ChatGPT and Render AI in the Same Workflow
These are not competitors on your desk. ChatGPT is excellent for exploration, boards and anything with lettering. Render AI is built for the production side — structure fidelity, batches, project organisation and video.
| Criterion | ChatGPT (GPT Image 2) | Render AI |
|---|---|---|
| Prompting | Conversational, excellent at following long written briefs | Design-specific controls and presets |
| Sketch fidelity | Good, but geometry can drift across iterations | Structure-locked modes built for sketch and CAD input |
| Text inside the image | Best in class — boards, labels, signage | Not the focus; but acceptable |
| Volume of images | Capped per plan, one request at a time | Session and variations in parallel |
| Project organisation | Lives in a chat thread | Projects, boards, versions and client sharing |
| Upscaling | No real upscaler — you are stuck with the size it generated | Dedicated AI upscaler to +4K and +6K print resolution with added detail |
| Video | Separate tool, not part of the image flow | Animate any render into a walkthrough or orbit |
Further Reading
Resources for Architects and Designers
Official OpenAI documentation, architecture media coverage, and more prompt libraries from the Render AI team.
Official Sources
Architecture Media
More from Render AI
Frequently Asked Questions
About ChatGPT image generation and GPT Image 2 for architectural rendering
- ChatGPT generates images with GPT Image 2, released inside ChatGPT as ChatGPT Images 2.0. It reasons about the request before it draws, which makes it strong at following long written briefs — exactly how architects describe a project. It handles material swaps, time-of-day changes and presentation layouts well. Its stand-out advantage over other image models is legible text inside the image, which makes it genuinely useful for competition boards, diagrams and signage mockups.
- Write an instruction, not a keyword list. Start with the action (turn the uploaded sketch into a photorealistic render), then lock what must not change (keep the massing and window positions exactly as drawn), then specify materials, lighting direction and colour temperature, camera position and lens, context and people, and finally the output format and aspect ratio. GPT Image 2 follows labelled clauses far more reliably than comma-separated tags.
- Yes. Upload the sketch, plan, elevation or 3D viewport screenshot first, then send the prompt in the same message or the next one. ChatGPT reads the image before planning the render. You can attach up to 16 reference images in a single request, which lets you combine a sketch with a site photo and material samples. Geometry fidelity is good but can drift across several iterations, so re-upload the original drawing when you start a new direction.
- Because it renders text accurately. You can ask for a specific title, drawing labels, level markers, a scale bar and captions with the exact wording in quotation marks, and it will reproduce them. Other image models usually produce lettering that looks like text but is not readable. Always verify dimensions and technical annotations yourself — the model writes convincing numbers it has not calculated.
- OpenAI does not publish a fixed table and adjusts caps with demand. In practice, free accounts get a handful of generations per day in Instant mode only, while Plus, Pro, Business and Enterprise plans get much higher allowances plus Thinking mode, which plans and self-checks the image before generating. If you need consistent volume, batches and variations for a live project, a dedicated rendering platform removes the cap problem.
- Yes. The structure transfers directly. The instruction-first format used here works with Render AI, Nano Banana Pro, Midjourney and Flux-based tools — you may only need to shorten the brief for models that do not reason before generating. Every prompt on this page has a one-click button to open it in ChatGPT, in Gemini, or directly inside Render AI Create.
Render AI
No Daily Caps. No Geometry Drift.
Upload your sketch, paste any prompt from this page, and get a professional architectural render in seconds with Render AI.
Create Free AI Rendering