Interior Design AI Rendering: Master Focal Lengths (12mm, 35mm, 100mm) from Sketch to Photoreal

Converting a sketch into a high-quality architectural render has never been easier—or more powerful. But there’s a critical detail most designers overlook: focal length control. Just like a photographer choosing between a 35mm lens for environmental storytelling or a 100mm lens for intimate detail shots, certain AI rendering tools like RenderAI give you the same creative power. By defining the right camera focal length, you transform a flat sketch into a photorealistic interior that speaks directly to your design intent.
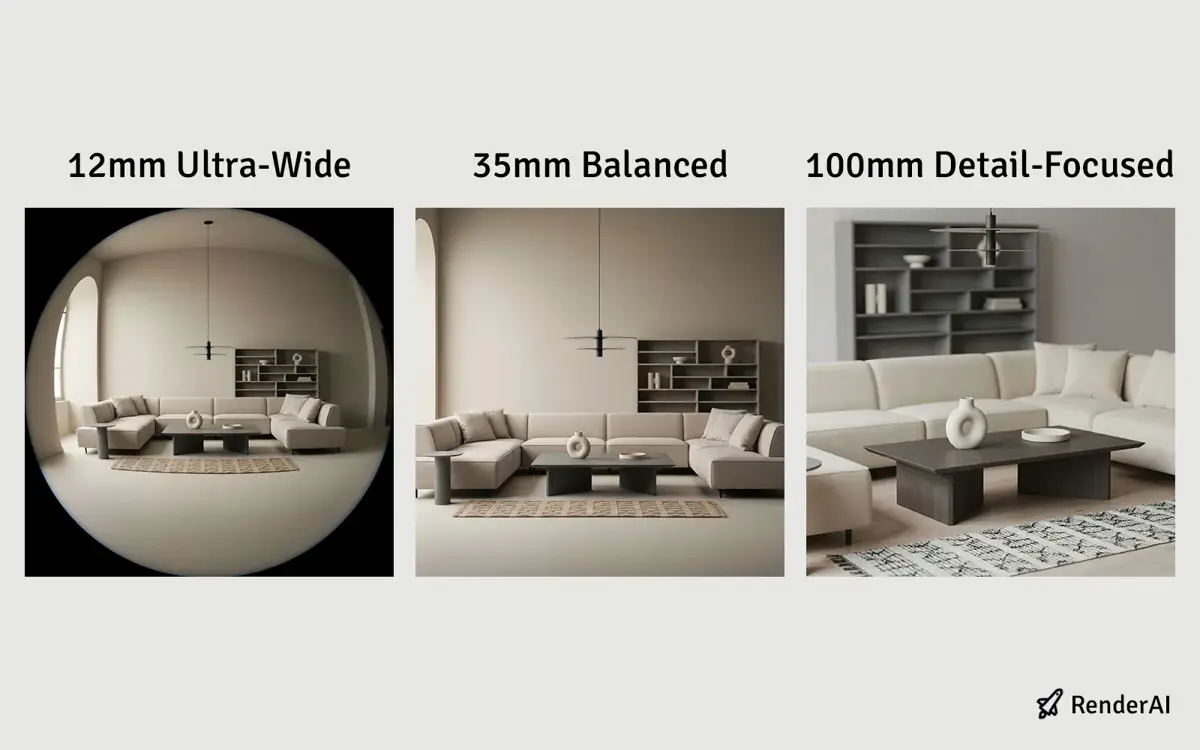
In this guide, we’ll show you how to leverage three essential focal lengths—12mm, 35mm, and 100mm—to convert sketches into client-ready renders using AI. You’ll discover how these focal lengths mirror real photography principles, why they matter for interior visualization, and how RenderAI enables this level of creative control without hassle and without learning specific prompt engineering.
Understanding Focal Length in AI Rendering
Focal length is the distance (in millimeters) between a camera’s lens and its focal point. In traditional photography, this single parameter controls everything: field of view, perspective distortion, background compression, and overall mood. The same principle can be replicated to AI-generated architectural renders.
When you control focal length in AI rendering tools like RenderAI, you’re not just changing the camera angle—you’re fundamentally altering how your design communicates. A 12mm ultra-wide shot can make a cozy AI render living room or bathroom feel expansive and dramatic, while a 100mm telephoto perspective can create intimate, compressed compositions that emphasize luxury materials and details.
The key insight is that focal length affects spatial perception more than any other camera parameter. By mastering these three focal lengths, you’ll transform simple sketches into professional architectural visualizations that rival traditional photography.
Transform sketches into photorealistic renders using focal length control with RenderAI
Three Essential Focal Lengths for Interior Design
12mm: Ultra-Wide Environmental Shots
A 12mm focal length captures maximum space in a single frame. This ultra-wide perspective is ideal when you need to showcase:
- Entire rooms in one cohesive image
- Spatial relationships and layout flow
- Real estate presentations requiring full-room context
- Dramatic, immersive interior environments
Pros: Shows the complete room, creates spacious feeling, captures design intent holistically
Cons: Can introduce subtle distortion; best suited when camera is positioned thoughtfully to avoid awkward warping
The 12mm focal length is your go-to choice for establishing shots that help clients understand the complete spatial experience of your design. It’s particularly effective for open-concept spaces, large living areas, and when you want to demonstrate how different zones within a room interact.
AI-replicated 12mm effects may occasionally produce black vignetting or suboptimal distortion, but RenderAI lets you refine these effortlessly through settings, guidance prompts, and quick iterations.
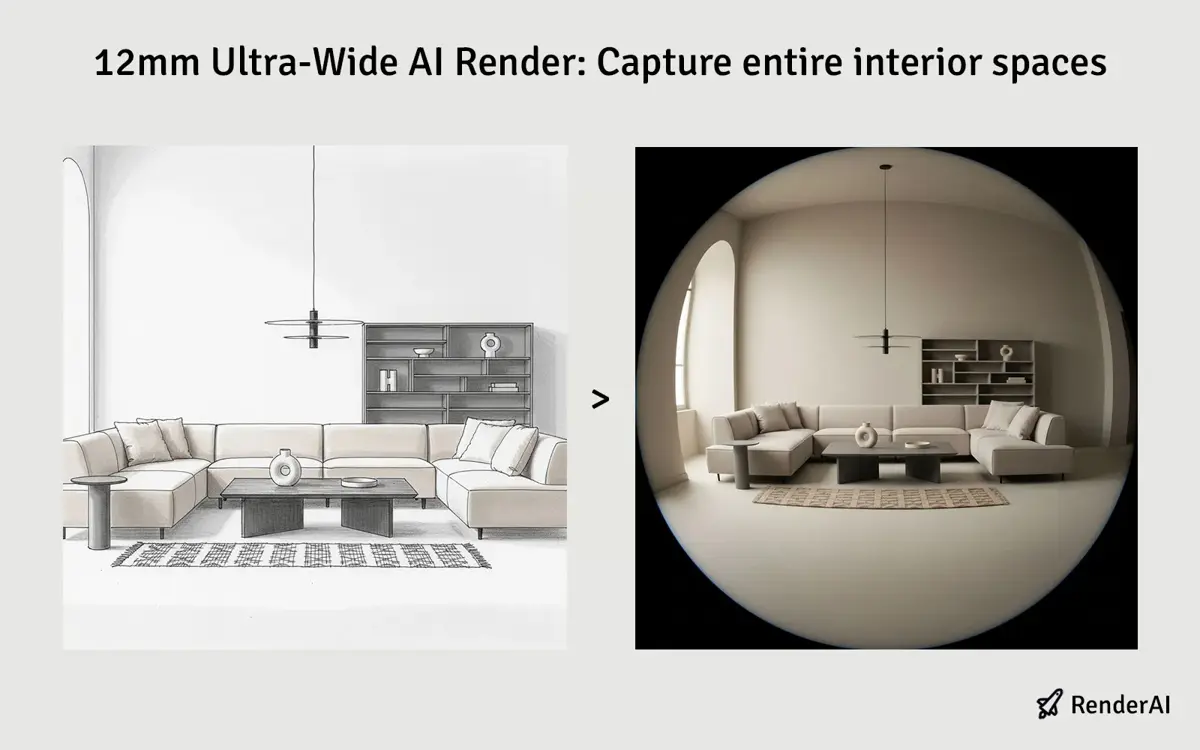
12mm Ultra-Wide AI Render: Captures entire interior spaces with immersive environmental context
35mm: The Balanced Perspective
A 35mm focal length sits in the “sweet spot” for interior design AI photography. This moderate wide-angle is the closest to human eye perception and delivers:
- Natural, comfortable viewing experience
- Balanced relationship between space and detail
- Professional architectural aesthetics without extreme distortion
- Ideal for client presentations and portfolios
Pros: Most versatile; looks natural and realistic; professional standard in architectural photography
Cons: Shows less overall space than 12mm; may not capture complete room if space is very large
Think of 35mm as your default focal length for most interior visualization work. It provides the most natural-looking results that clients can easily relate to, making it perfect for portfolios, presentations, and marketing materials where realism and approachability are key.
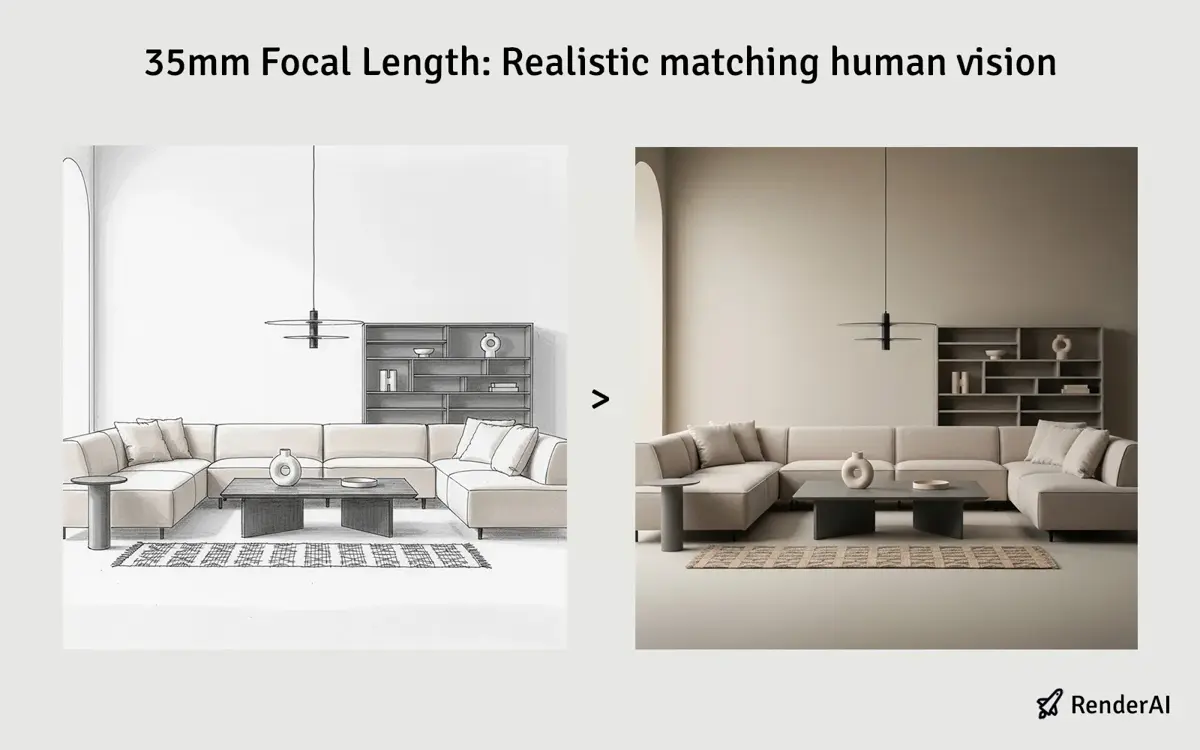
35mm Balanced AI Render: Natural human-eye perspective for professional architectural visualization
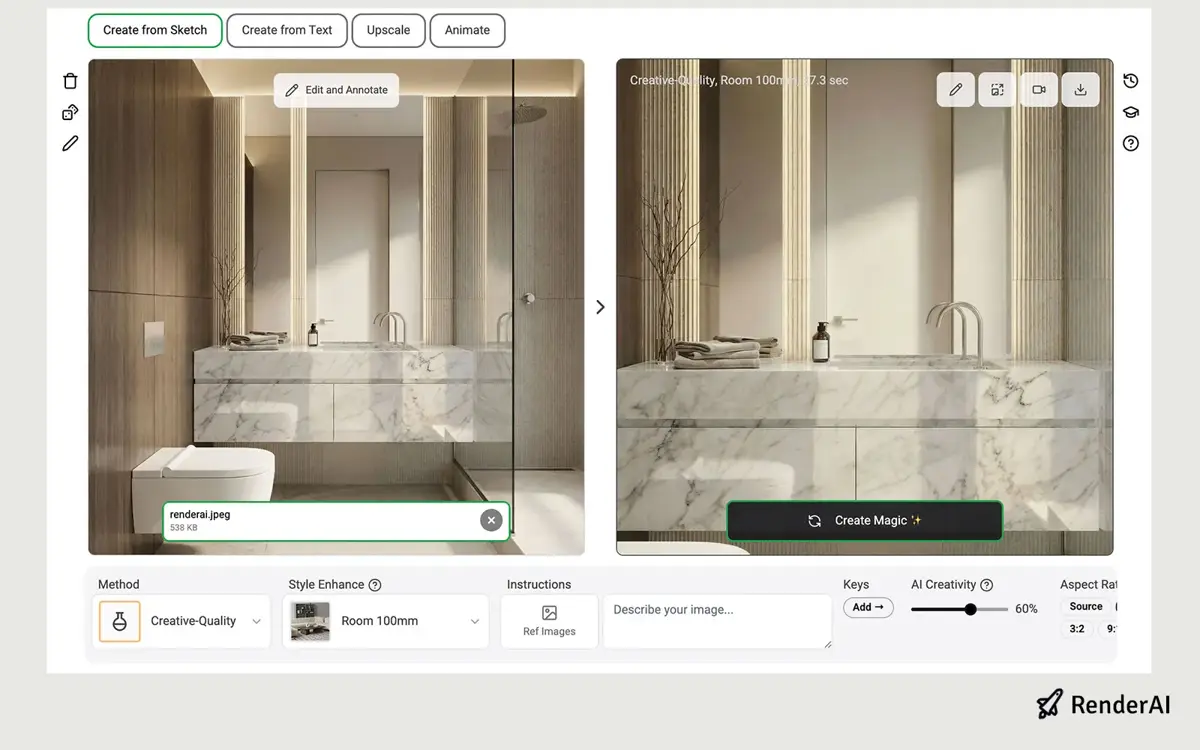
100mm: Telephoto Detail and Compression
A 100mm telephoto focal length compresses space and emphasizes detail. This longer perspective excels for:
- Detail-focused shots (furniture, materials, finishes)
- Accent wall or feature highlighting
- Intimate, close-up interior vignettes
- Creating visual emphasis and cinematic composition
Pros: Flatters materials and details; compressed background makes subjects “pop”; cinematic feel
Cons: Shows limited room context; requires multiple angles to tell complete story
The 100mm focal length is your artistic tool for creating mood and emphasis. Use it when you want to highlight luxury materials, showcase specific design elements, or create dramatic, compressed compositions that draw the viewer’s eye to particular features.
This AI rendering style excels for AI moodboard generation, capturing intricate details from existing images so you can focus purely on key elements.
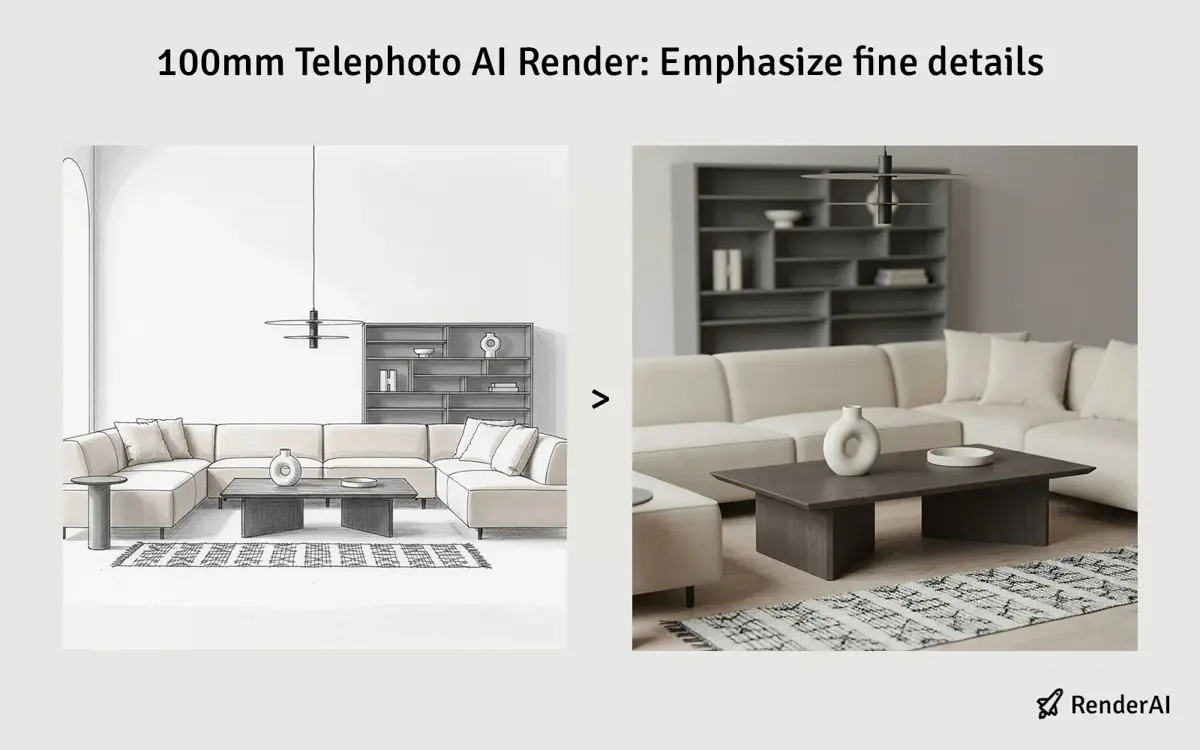
100mm Telephoto AI Render: Compressed perspective emphasizing luxury materials and fine details
Practical Workflow: Converting Sketches with Focal Length Control
Here’s how to maximize your AI rendering workflow using focal length as a creative tool:
Step 1: Prepare Your Sketch
Start with a clean, readable sketch, floor plan, or image. Remove unnecessary lines or information. The cleaner your linework or photography, the better the AI understands your spatial intent.
Step 2: Define Your Primary Focal Length
Before generating renders, ask: What story does this space tell?
- Need to showcase the whole room for a real estate listing? Use 12mm for maximum impact.
- Creating a professional portfolio piece for architects or designers? Choose 35mm for balanced, natural aesthetics.
- Highlighting luxury finishes or specific design feature? Go 100mm for detail emphasis.
Step 3: Generate Multiple Angles
Don’t stop at one render. Professional architectural visualization uses a three-camera approach:
- Wide establishing shot (12mm): Full-room context, spatial flow
- Medium architectural view (35mm): Primary presentation angle, natural perspective
- Detail close-up (100mm): Feature wall, materials, emotional impact
This multi-angle approach is standard in high-end architectural photography and delivers more compelling client presentations.
Step 4: Refine and Upscale
Once your AI render is generated, use RenderAI’s upscaling features to push the quality to 8K for print-ready presentations and marketing materials.
Photography Principles Meet AI Rendering
The convergence of photography expertise and AI technology is reshaping how designers communicate spatial vision. Just as professional photographers master focal length to control mood and perspective, designers using AI rendering tools now access those same creative controls instantly.
This democratization means:
- Faster iterations: Test multiple focal lengths in minutes instead of hours of 3D modeling
- Consistent aesthetics: Replicate professional architectural photography standards in your renders
- Better client communication: Present spaces using familiar photographic language that resonates with non-designers
- Competitive advantage: High-quality, photorealistic AI renders elevate your portfolio and project proposals
By understanding focal length as both a technical specification and creative tool, you’re applying century-old photographic principles to cutting-edge AI technology.
Why Focal Length Control Matters
The ability to control focal length in AI rendering has profound implications:
For Designers:
- Showcase full spatial concepts in realistic, photorealistic contexts
- Test design directions faster during concept phases
- Create polished client-ready presentations from simple sketches
For Marketing & Real Estate:
- Generate multiple professional angles for listings, brochures, and websites
- Maintain consistent visual branding across projects
- Reduce time and cost compared to traditional photography shoots
For Project Communication:
- Use recognizable photographic language to explain design decisions
- Bridge the gap between abstract sketches and finished interiors
- Enable stakeholders to visualize design intent accurately
Ready to Master Focal Lengths in Your Renders?
Mastering focal length control transforms AI rendering from a “quick visualization tool” into a professional-grade design communication platform. Whether you’re creating ultra-wide environmental shots at 12mm, balanced architectural views at 35mm, or intimate detail compositions at 100mm, you’re harnessing the same creative principles that professional photographers have relied on for decades.
The path from sketch to photorealistic render no longer requires weeks of 3D modeling or expensive rendering farms. With AI tools like RenderAI and a clear understanding of focal length principles, you can generate client-ready visuals in minutes—maintaining full creative control over perspective, mood, and spatial emphasis.
Using RenderAI to modify rendering flocal length with AI
Ready to transform your sketches into stunning photorealistic renders? Explore RenderAI’s focal length control features and discover how professional photographers’ techniques can elevate your interior design presentations. Start with a simple sketch, choose your focal length strategically, and watch as AI converts your vision into photorealistic reality.
References:
- Focal Length – Photography Principles
- Understanding Focal Length in Architectural Photography
- Top AI Interior Rendering Tools for Architects and Designers
- AI Rendering Tools for Architecture and Product Design
- Render AI Sketch to Render with Focal Length Control
- This content uses AI research assistance with RenderAI expert analysis and human editing.
About the Author:
This article was written by Francisco. Architect, Visual Designer & Founder of RenderAI.


